

Torso Angle in Bike Fitting: Ranges by Discipline and Handlebar Height
Updated · Written by Stas Bashylov, Ihor Twin
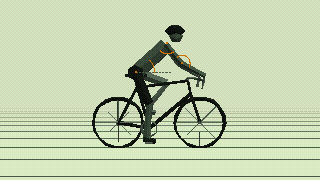
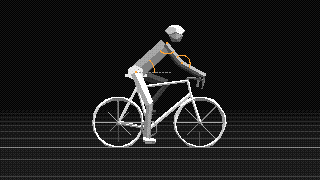
| Angle | Range | If it is out of range |
|---|---|---|
| Torso Hip–shoulder line against the level line | 40–45° (road) | Below: raise the bars. Above: lower them, if you want a lower position. |
| Shoulder Hip, shoulder, elbow | 80–110° | Below: cramped, try a longer stem. Above: stretched, try a shorter one. |
| Elbow Shoulder, elbow, hands | 150–165° | Above: soften your elbows. Below: ease off your grip. This is posture, not a bike part. |
One change at a time
Bending your elbows lowers your torso too, so settle your elbows first, then the stem length, then the bar height. Ride a few times after each change.
Torso angle is the angle between the line from your hip to your shoulder and the horizontal. It is the simplest number for how low or upright you sit on the bike, and it is what changes most when you move your handlebars up or down.
A smaller angle is lower and more aerodynamic. A larger angle is more upright. There is no single correct value: each discipline has its own range, and your flexibility and comfort decide where in it you belong.
What exactly is measured
Two points: the hip joint (greater trochanter) and the shoulder joint, not the top of the shoulder. Draw a line between them and measure its angle against the horizontal. 0° would be lying flat, 90° is sitting bolt upright.
The ranges below assume your hands are on the hoods. On the drops your torso is lower, and on the tops it is higher, so compare a reading only with a reading taken in the same hand position.
Recommended torso angle by discipline
| Discipline | Torso angle | Character |
|---|---|---|
| Road (race) | 40–45° | Low and long |
| Gravel and endurance road | 50–58° | More upright, higher bars |
| Cyclocross | 48–52° | Between race and endurance |
| MTB XC | 50–60° | Upright enough to handle rough ground |
| Touring | 60–65° | Upright, for comfort on long days |
| TT and triathlon | 10–25° | As low as you can hold |
These are the ranges the bike fit calculator gives and the position check compares you with. If you pick a riding position level, the position check uses a narrower window inside the range. The comfort level keeps the full range.
How to measure your torso angle
- Put the bike on a trainer and level it. Wear fitted clothing so your hip and shoulder are visible.
- Place the phone side-on, level, at roughly hip height and 2–3 m (7–10 ft) away, so the whole bike is in frame.
- Ride at your normal effort with your hands on the hoods. The pedal position does not matter for the torso angle.
- Measure the angle between the hip–shoulder line and the horizontal, by hand on the photo or automatically with the position check.
The position check finds the horizontal from the bike’s wheels or from points you tap on the ground, and it also shows your shoulder and elbow angles. More on the camera setup in how to check your cycling position at home.
How to change it: handlebar height
Your torso follows your hands. Raise the bars and the torso comes up, lower them and it goes down. A longer stem also lowers the torso a little, because you reach further forward.
- Spacers. Moving spacers from above the stem to below it raises the bars, and the reverse lowers them. Forks usually allow about 30–40 mm of spacers under the stem; check the manufacturer’s limit.
- Stem angle. Flipping the stem (for example from −6° to +6°) or fitting one with a different angle changes the bar height without spacers.
- Elbows. Bending your elbows lowers your torso without touching the bike. Before you move the bars, check that your elbows have a slight bend; see shoulder and elbow angles.
With a wheel visible in your photo, the position check turns the gap to your range into millimeters of bar height, and where it fits into spacers or a stem angle. Without a wheel it gives the direction only.
Change one thing at a time, in small steps, and ride a few times before the next change. Set saddle height first, then reach (stem), then bar height. Start from the saddle height guide if you have not set it yet. To preview how spacers, stem length and stem angle would move your torso angle on your own bike’s geometry, try the fit constructor.
Frequently asked questions
What is a good torso angle for road cycling?
Is torso angle measured from the horizontal or the top tube?
How do I make my position more upright?
Sources
- Empfield D. Coordinate Predictors Versus Body Angles in Road Bike Fit. Slowtwitch; 2012.
- Kolehmainen I, Harms-Ringdahl K, Lanshammar H. Cervical spine positions and load moments during bicycling with different handlebar positions. Clin Biomech (Bristol). 1989;4(2):105–110. Link
- Streisfeld GM, Bartoszek C, Creran E, et al. Relationship between body positioning, muscle activity, and spinal kinematics in cyclists with and without low back pain: a systematic review. Sports Health. 2017;9(1):75–79. Link
- Slane J, Timmerman M, Ploeg HL, Thelen DG. The influence of glove and hand position on pressure over the ulnar nerve during cycling. Clin Biomech (Bristol). 2011;26(6):642–648. Link